Videography for Beginners – How to Make Videos Using a DSLR
This Videography for Beginners tutorial will cover every topic that deals with the art of video making. We also have a full fledged Videography for Beginners Course with video lessons, in case you are someone who likes to learn by watching.
Whether you want to create and shoot videos for your Online Courses, YouTube channel, for a client or just for hobby, this guide will teach you everything you need to know about shooting videos from your DSLR or Mirrorless camera or any other type of a camera, even if you have no prior knowledge at all.
Even though this guide is mainly for cameras, you can use this to shoot videos from your phone too since the principles remain the same. Cameras just allow you to use more features than a phone would. But these days even phones do a great job.
This is going to be a series of articles which is divided into the following parts:
- Part 1 – Understanding Resolution and Frame Rate
- Part 2 – Settings to be used for Video (Aperture, Shutter Speed and ISO)
- Part 3 – How to Focus in Videos (Auto-focus and Manual Focus)
- Part 4 – Shooting our first video
- Part 5 – Recording Audio
The links to the next part are also given at the bottom of each article.
Let’s get started with Part 1 where we will be learning about Resolution and Frame rate, the two most important settings that you will have to dial in your camera or phone before you start shooting videos.
Understanding Resolution and Frame Rate
Resolution
Resolution refers to how densely the pixels populate your video. The videos that we see are nothing but a bunch of pixels on the screen which are packed together. Let’s look at some popular resolution formats in order to understand this:
720 X 480 – Standard Definition (SD) – 480p
Let’s spend some time in understanding this resolution because that will make the task of understanding the other resolutions easier.
Resolutions are written in the above format in which the first number represents how many pixels are there in the horizontal side and the second number represents how may pixels are there in the vertical side. So if you were to visualize this in terms of a video, it would look something like this:
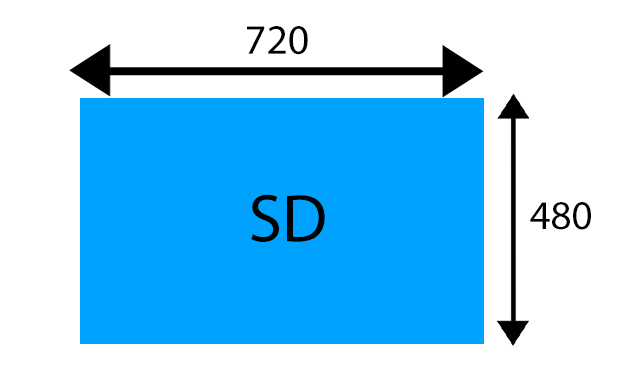
The total number of pixels in this resolution would be 720 * 480 = 3,45,600
Because the number of pixels is lower, this resolution doesn’t result in very good looking videos, especially when played on bigger screens which can accommodate more pixels. More the number of pixels, the better the video looks.
The name of this 720 X 480 resolution is Standard Definition or SD. Resolutions are also named by the number of pixels on the vertical side. For example, the 720 X 480 resolution is also called as 480p (p stands for progressive scan).
This resolution is almost obsolete now and no one really uses it.
1280 X 720 – High Definition (HD) – 720p

In this resolution which is called as the High Definition resolution, the horizontal side has 1280 pixels and the vertical side has 720 pixels. The total number of pixels are 1280 X 720 = 9,21,600 pixels. Almost close to 1 megapixel (1 million pixels).
Since the number of pixels is more than SD resolution, this is obviously better.
But even this resolution is hardly used nowadays and for our purpose of shooting videos, we won’t be using this.
1920 X 1080 – FULL HD – 1080p
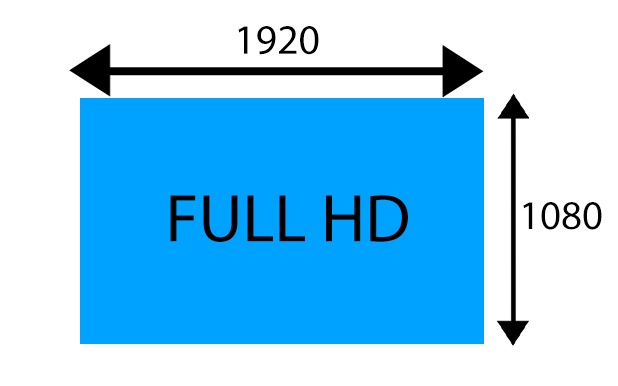
This is the next resolution which is called FULL HD. The total number of pixels are 1920 X 1080 = 2,073,600 pixels or 2 megapixel.
This is the one of the most widely used resolutions when it comes to shooting videos and has been the standard for many years.
In this series of articles, we will be sticking to using this resolution for our videos. We’ll understand why after we talk about the next resolution.
3840 X 2160 – 4K UHD
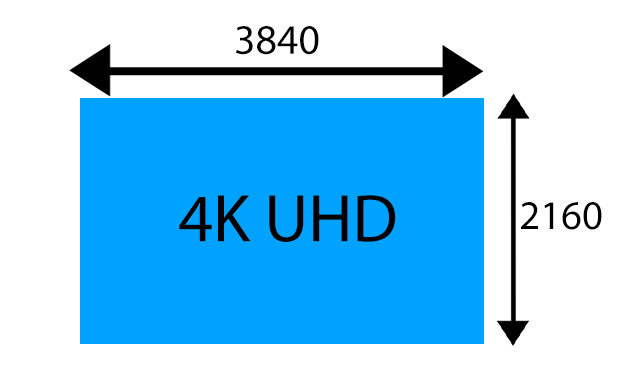
The 4K resolution is currently the hottest thing in the videography world. The number of pixels are 3840 X 2160 = 8,294,400 pixels or 8 megapixel.
It’s becoming so popular because the large number of pixels give rise to amazing video quality where finest of the details can be seen. And since the number of pixels is so high, a 4K footage can easily be seen on large screens without losing any quality. The large number of pixels also allow videographers to easily crop videos in editing without loss of quality.
But why will we still be sticking to the FULL HD resolution and not 4K?
There’s no doubt that 4K is the future and looks better than 1080p (FULL HD). But there are some reasons as to why you should start off with 1080p when you are a beginner:
- First of all, since you are reading this article, I’m assuming you are a beginner and you mostly won’t have a camera or a phone that offers the capability to shoot in 4K. As of now, few cameras and phones offer this feature.
- Secondly, even if you have 4K shooting capability, you most likely may not have a laptop/desktop and software that is powerful enough to handle 4K editing. It’s much easier and faster to edit 1080p videos.
- Since you are a beginner, a lot of videos you will be shooting may just be meant to be watched on smaller screens like phones or laptops. On smaller screens it’s tough to make out the difference between 4K and 1080p since the pixels are so closely packed together.
- Since you are a beginner, it’ll be better to first understand the whole process from shooting to editing using an easier resolution like 1080p. Once you have got the hang of things, you can always shoot in 4K as everything else would remain the same.
Having said that, if you still want to shoot in 4K, you can do that as you follow along this article. Apart from the resolution, the rest of the things will remain the same.
Now that we know what resolution is and which one we will be using, it’s time to go to the next setting which we will have to choose in our camera and that is called Frame Rate.
Frame Rate
When you shoot videos, your camera or phone takes multiple shots (called as frames) every second. When all these frames are played back together, they form the video that we see.
The number of frames recorded per second is called as the Frame rate. It’s also referred to as fps (frames per second).
You can tell your camera how many frames per second it should record.
For instance some of the popular Frame rates are 24 fps, 30 fps, 50 fps, 60 fps and 120 fps.
Most of the DSLRs and Mirrorless cameras have the capability to shoot up till 60 fps. And few even have the capability to shoot at 120 fps.
But does a bigger frame rate mean a better frame rate?
Absolutely not.
Frame rates cannot really be compared because they serve different purpose.
For instance, higher frame rates like 120 fps are required when you intend to shoot slow motion videos. That’s because the more the frames that are captured, the more slower the video can be made since it’s easier to fill each second with more number of frames. But we’ll talk about slow motion later on.
Right now we are interested in knowing which frame rate is the best for us.
The answer to that is – 24 fps.
Why?
Because 24 fps is the frame rate where the video looks closest to how our eyes see things naturally.
One of the main reasons why that happens is because at 24 fps, there aren’t that many frames per second, which results in some gaps between each frame. That leads to a nice looking motion blur whenever the subject is moving, just like how our eyes also see a motion blur when something is moving quickly.
Whereas at higher frame rates like 60 fps and 120 fps, there are too many frames per second and therefore the motion blur reduces. This might sound like a good thing but it’s not because without the motion blur, the movement of the subjects starts to look very unnatural.
Let’s look at two videos shot at different frame rates in order to understand this.
The video below is shot at 24 fps.
Here you can see that the movement of my hand looks pretty natural as you can see a bit motion blur, just like you would see if you were to observe this with your eyes if you were actually watching me.
The video below is shot at 60 fps
This time you can see that the movement looks a bit unnatural and weird. One of the reasons for that is that each second of this video is packed with 60 frames, thereby reducing the motion blur.
Secondly, you’ll be learning later on in this series about how shutter speed works with frame rate and you’ll be learning that time that higher frame rates require faster shutter speeds, which adds to the choppiness and the unnatural look of these videos.
We’ll also be seeing later on why higher frame rates like 60 fps and 120 fps are good for slow motion shooting and how exactly to achieve that.
But that’s for later. Right now, we can conclude that 24 fps is a good frame rate for us. In fact most of the movies that we see are entirely shot at 24 fps.
A lot of people also use 30 fps. You really won’t be able to tell too much difference between 24 fps and 30 fps.
But we’ll still be using 24 fps since it’s definitely the most popular frame rate.
Dialing in the Resolution and Frame rate in our Camera or Phone.
So now we have been able to conclude the following:
The best resolution for us is – 1920 X 1080 or the FULL HD resolution.
The best frame rate for us is – 24 fps.
So let’s dial in these settings in our camera.
Though each camera or phone will have different ways to change this, let’s at least look at the videos below to get an idea on how to set these settings:
Here I’m using the Nikon D5300:
Alright, so now we are done with these initial settings that will form the base of our video.
In the next part, we’ll move on to understanding what settings should we be dialing in our camera in accordance with the type of video we want to create.
Settings to be used for videos (Shutter Speed, Aperture and ISO)
In the last section, we learned about what resolution and frame rate are. In this part we’ll be learning about what settings to dial in your camera according to the type of video that you want to create.
Now if you are using a camera that doesn’t allow you to change the settings of Aperture, Shutter Speed and ISO, this step probably won’t apply since you’ll only be able to shoot in the automatic mode of the camera, i.e, after setting the resolution and frame rate, you’ll just be hitting the RECORD button.
But I still suggest you to go through the settings below as it will give you an idea of how shooting videos really works when you do decide to take it up a level or two later on.
So let’s get started:
First of all, you’ll change the mode of shooting to manual mode. You can do this by changing the mode dial to M, like shown below:

The letter M stands for manual mode.
Shooting in manual mode means you have the three settings – Aperture, Shutter Speed and ISO in your control.
Shutter Speed
This is perhaps the easiest setting to set on your camera since it will depend on the frame rate you are using.
Here’s the rule:
Shutter speed to be set = 1/(2 X Frame Rate)
For example, in our case, we have already seen that we will be using 24 fps. That means the shutter speed we will be using according to the rule above is 1/(2 X 24) = 1/48. Now since 1/48 shutter speed is not available on any camera, we will be using the next available shutter speed, i.e, 1/50.
Similarly, if you are shooting at 30 fps, the shutter speed would be 1/60. If you were shooting at 60 fps, the shutter speed would be 1/125, and so on.
This rule is called as the 180 Degree Shutter Rule.
You really don’t have to understand how this rule was formed but what you should know is that following the shutter speed and frame rate combo using this rule produces the most natural and smooth looking motion in your videos for the frame rate that you have selected.
For instance, not following this rule and using a very slow shutter speed will start to produce a very blurry motion and conversely, using a faster shutter speed will start to produce a choppy looking video.
So in our case, since we are using 24 fps, we will be setting the shutter speed to 1/50
Aperture
Aperture is the setting that will determine how your video will actually look. Will it have a blurred background or will everything be in focus?
Aperture basically refers to the opening in the lens. It controls the light coming into the camera through the lens. It looks something like below:

You can see that the aperture can be changed by changing the f-stop number on your camera. It has an inverse relationship with the opening of the aperture.
When shooting videos, this is one of the reasons why it’s preferable to have a lens which allows shooting at wider apertures. Because that allows in more light and therefore keeps the ISO value down, which in turn keeps noise levels low. But you’ll understand that when we talk about ISO later on in this article.
Right now what you have to understand is that there is another very important function that Aperture plays, which is that it controls the depth the field of your video.
Depth of field just refers to how much of the area is in focus in the video.
A shallow depth of field refers to a situation in which only a small amount of area is in focus and the rest of the things are out of focus. For example, the subject will be in focus but the background will be blurred. This is a very popular look as blurred backgrounds looks amazing in both photos and videos.
A deep depth of field means that everything in your video will be in focus.
A shallow depth of field is achieved at smaller f-stop numbers or when the aperture is wide open. So if you have to blur the background in your video and only keep the subject in focus, you can use small f-stop numbers like f2.8, f1.8, f1.4, etc.
Of course, how wide the aperture can go will depend on the lens you are using. A kit lens (a lens that comes with the camera) won’t allow you to go very wide. Hence, if you really intend to shoot videos seriously, getting your hands on a prime lens like the 35mm f1.8 or 50mm f1.8 will be a good option since it’s cheap and allows you shoot really wide at f1.8. This means you can get really blurred looking backgrounds.
Let’s look at a video which I shot using a 40mm f2.8 lens. This video has been shot at f2.8, giving the blurred look to the background as you can see below:
(This video is from my main Videography for Beginners course, which is available via Udemy.com)
Conversely, if you use a a larger f-stop number, like f11, f13, f22, etc, the depth of field will start to deepen and everything will be in focus in your video. Let’s look at a video that demonstrates this:
(This video is from my main Videography for Beginners course, which is available via Udemy.com)
Shooting at deeper depth of fields can also be helpful especially in situations where your subject is moving a lot and you need to still maintain focus on the subject. In those cases, sometimes it’s better to use a larger f-stop number to keep the whole scene in focus. We’ll talk more about this when we come to focusing part in the next section.
But a lot of times, we will be using a shallow depth of field as that looks better.
When you are using a small f-stop number like f1.8 or f2.8, there’s one problem you can face while shooting your video. Which is that using such a wide aperture may let in a lot of light into the camera and may cause your video to become overexposed. We’ll learn how to correct that using a Neutral Density (ND) filter later on in this series.
ISO
ISO will be the last setting that you will be dialing in your camera after you have set the Shutter Speed and Aperture.
ISO refers to the sensitivity of the sensor of the camera to the light that is falling on it.
If you increase the ISO value, the sensor starts to amplify the light more and thereby making the video brighter.
If you decrease the ISO value, the video will become darker.
Also, at higher ISO values, you can start to see noise in the videos (noise refers to those bad looking grains). And at lower ISO values, the video will look clean.
So what ISO value should you select?
The ISO value that you will be selecting will depend on how much light (artificial and natural) is present in the area that you are shooting in.
One of the most important points to keep in minds is that in most cases, more lighting means a better video quality since you don’t have to rely on ISO to brighten up the video.
We’ll be talking a bit more about lighting in a later part in this series where we’ll talk about the different types of lights you can use for your videos.
We’ll also be seeing how to exactly set the ISO value when we shoot our first video later on in the series.
But the point to understand right now is that shooting your videos in ample amount of lighting is important. Let’s look at a video that demonstrates this point:
(This video is from my main Videography for Beginners course, which is available via Udemy.com)
You can see that this video had a lot of noise and it doesn’t look good at all. This is because I shot this video in a room where there was very less light. So I had to increase the ISO on my camera to a very high value which introduced the bad looking grains (noise).
This is why even when you are shooting with your phone, make sure you do it an area which has ample amount of light because your phone works the same way. The moment it senses less light it just bumps up the ISO automatically.
Alright, so now you know how the different settings work. Now there’s one more thing you need to know before we actually start shooting our first video, which is, how to focus on our subject.
In the last part, we learned how the different settings like Aperture, Shutter Speed and ISO work when you are shooting videos.
How to Focus in Video Making (Auto-focus and Manual Focus)
In this part, we’ll be learning how to focus in our videos and that will enable us to finally start shooting our first video.
When it comes to focusing there are two methods – Auto Focus and Manual Focus.
When it comes to photography, we already know that auto focus is the preferred option since it’s more accurate and quicker than manual focus.
But when it comes to shooting videos, manual focus is used more popularly as it is more reliable than auto focus. But why is this the case?
Unlike still photography, videos involve subjects that are moving.
Moving subjects can make it tough for the auto focus system to reliably follow their movement and maintain focus on them.
Though modern day mirrorless cameras are getting better at this, they still miss focus often when it comes to complex movements.
This is why manual focus is preferred in videos. Because once you lock focus on the subject using manual focus, the focus will stay locked onto that area irrespective of what the subject is doing.
In fact most of the movies we see are completely shot using manual focus.
Let’s see a video which demonstrates this point:
The video above is from my Studio Photography for Beginners Course, and in this video I was demonstrating the usage of a strobe light and how to trigger it using the camera. You can notice in the video that as I’m moving the camera, the camera is losing and hunting focus quite a number of times.
This is because while shooting this video, I accidentally left the auto focus on.
If instead, I had selected manual focus and locked the focus on that part of the table where the camera would usually be, this problem would not have occurred.
But does this mean that there is no way to use auto focus?
There is but it will depend on the camera you have. Not all cameras offer very reliable auto focus mechanisms.
For instance, Canon and Sony cameras usually do a better job than Nikon cameras when it comes to video auto focus.
For instance, in the video below I’m using the tracking auto focus feature available on my Canon 700D:
You can see that the camera does a fairly good job in keeping track of my movements. After you change the focus mode to tracking, the camera asks you to touch the screen and select the part of the video where you would like the focus point to stay. In this case I had selected my face, so it kept the focus on that even when I moved.
If you are beginner, I would still suggest you use manual focus and get used to that first as it’s easier and more reliable.
Using manual focus always doesn’t mean that you have to fine tune the focus using the focus ring. Sometimes, it’s better to use auto-focus to achieve focus on our subject and then switch the focus mode of the lens from auto focus to manual focus so the focus stays locked. We’ll be seeing that in the next part when we shoot our first video.
But for now let’s also look at some common questions related to focusing:
How to focus on yourself?
Focusing can be a bit of a challenge when you intend to focus on yourself and you don’t have anyone else around you to help you out.
There are a lot of ways around this.
If you are going to be fairly still in your video (like sitting or standing in one place), then it’s a fairly easy job. You can follow the old school technique of pre-focusing on the area where you would ultimately be sitting or standing and then going there when the video starts recording. The focus will stay locked in that place.
Doing this is slightly challenging when you are shooting at shallow depth of fields because you’ll have be fairly accurate in making sure you are exactly in the area where the camera’s focus is.
To overcome this problem, I use the following approach:
- I set the camera’s auto-focus to face priority. So it automatically brings the focus on my face.
- I then go and stand in the area where I ultimately intend to be.
- Then I take a shot using a wireless remote shutter/app.
- I then mark the area where I was standing.
- Then I go back to my camera and change the focus mode of the lens from auto focus to manual focus and then record the video.
In case your camera does not have face priority focus, you can put an object in place of yourself (like a light stand, tall piece of furniture, etc) and then focus on it and take a shot. Then follow the same procedure.
Are you getting confused? No issues. I will now be showing you the process of shooting a video.
Shooting Our First Video – Putting together all our learning
We’ve learned quite a bit till now, right from resolution to frame rate to lighting to settings to focusing. Now let’s put it all together and watch the video below where I show you how to create my own videos for my online courses:
In case you need to maintain focus on yourself while you are walking (like in travel vlogging), you can use the tracking auto focus feature like we saw before. Also make sure you are using a wide angle lens as the wider field of view will help you in maintaining focus easily.
How to keep focus on someone else who’s walking?
One way is to set the focus on them using manual focus and then walk along with them while trying your best to maintain the same distance between you and them.
Another thing that can help you in this case is to shoot at higher f-stop numbers or narrowing down the aperture to deepen the depth of field. That would mean that most of the scene is in focus anyway so even if they switch between different focal planes, it would keep them in focus.
You can also pre-focus on somewhere the person will walk to. In that case they will slowly come into focus as they reach that point and then again go out of focus as they move away from that pre-focused area. This adds a very cinematic effect to the shot and is widely used.
Alright, so now that you know how focusing works, it’s finally time to shoot our first video. We’ll do that in the next part.
One more practice video
Let’s look at another video where I walk you through the settings. This time it’s a simple video where I’m shooting a flower.
Now one of the things you must have noticed in the video above is that in order to get that shallow depth of field, a of light was coming into the camera.
Even when we made the shutter speed faster for the 60 fps video, you saw that we were able to shoot at ISO 200, which is not a big ISO value at all.
That’s because the wider aperture is letting in a lot of light.
Now in the video above, I was shooting at around 5:45 P.M when the ambient light was less. So I was able to get away with it.
The issue comes when you are trying to shoot a similar video during a period of the day when the ambient light is a lot more, like afternoon.
In that case, you may find that even if you are using the lowest ISO value, you still may end up with an overexposed video.
You really cannot change the shutter speed to cut down light since it has to be in accordance with the frame rate you are using.
So in such situations, you may be forced to give up the shallow depth of field and increase the f-stop number to cut down light. But that will also change the look of the video and the background will not be as blurred as before.
So what’s the way out?
The way out is to use a Neutral Density (ND) filter in such cases, just like you would do in photography. In videography, variable ND filters are more common since you can rotate the ND filter’s front element to change its strength. In photography this is not so essential since you always have shutter speed to work and change things with.
Let’s look at two videos where I show you the usage of a variable ND filter:
By now I hope you are getting familiar with the shooting part. An equally important part of making videos is recording audio. And that’s what we will be concentrating on in the next part.
Recording Audio
Recording audio is of course very important for any type of video but it becomes even more important if you are planning to make videos where voice-overs/dialogues have to be clear and noise-free.
A lot of times (especially in informational videos) Audio is actually more important than videos. Your audience can often forgive you for slightly substandard video but they won’t forgive your for bad audio since it causes discomfort.
One of the main culprits of bad audio is using bad microphones to record. No rocket science there.
When it comes to a DSLR or Mirrorless camera, the mistake that is often made by beginners is that they use the built-in mic of the camera. These built-in mics produce a very inferior output as we’ll soon be seeing.
The correct thing to do is to purchase a good quality external microphone and use that to record the audio. But before we talk about external microphones, I want you to watch a video which will show you the difference between using the built-in mic of the camera and an external mic. This video is from my Vlogging for Beginners course which is available on Udemy.
In the video above, I’m using one of my favorite external microphones called the Rode SmartLavPlus, which I have used to record most of my online course content. It’s a lavalier mic or lapel mic which can be attached to the collar of your t-shirt. And as shown in the video above, you can either use your smartphone or an external recorder to record with it.
I really love using lavalier mics because they give you so much flexibility. You can move around wherever you want without disturbing the audio. When you are starting out, it’s ok to use your Smartphone as the recording device with these mics using any voice recording app on your phone. But if you really want the audio to go the next level, I would suggest you go for an external recorder like the Zoom H1n.
The only issue is that since you are recording the audio separately, the video and the audio have to be synced in post processing. This is usually not an issue because it can be done with one click when you are using a slightly advanced video editing software. But if you are using a very basic video editing software like Openshot, then it can be a bit challenging.
One way of achieving this is to connect your mic directly to the camera’s built-in recorder. This is possible with a lavalier mic too but usually, a mic like the Rode VideoMicro Compact On-camera Mic is preferable. These on-camera mics are very popoular with vloggers since you simply mount them on the camera and connect them to the camera’s built-in recorder and you’re good to go. No syncing required too. They are great for capturing the ambient noises in the environment too and that’s another reason they are popular with vloggers.
But always remember the golden rule of audio – The closer the mic is to you, the better will be the output. One of the major factors that determines how good the audio output is the distance between the mic and yourself. If the mic is farther away, it will result in poorer audio, all other things being the same.
Conclusion – Some Important Resources for Further Learning
So that’s it for now. I hope that you liked this videography for beginners tutorial. Before I end this tutorial, I wanted to let you know that I have compiled a list of all the important Videography gear and accessories on one page, so you don’t have to research things on your own. You can access this page using the link below:
Also, I have a lot of online courses related to Videography, Video Editing and Audio Editing. You can see all these courses using the link below:
List of all our Videography, Video Editing and Audio Editing Courses